
Welcome back! Last week, I wrote about Giratina VSTAR. Due to space constraints, I didn’t write in detail about the deck’s matchups. However, I’ve received many questions about how to navigate certain matchups, so I decided to write this companion piece. (I want to use this opportunity to thank all of you who told me you appreciated that first article!)
If you haven’t read my general guide first [ https://www.tcgpark.com/a-guide-to-giratina-vstar/], I highly recommend that you do that first!
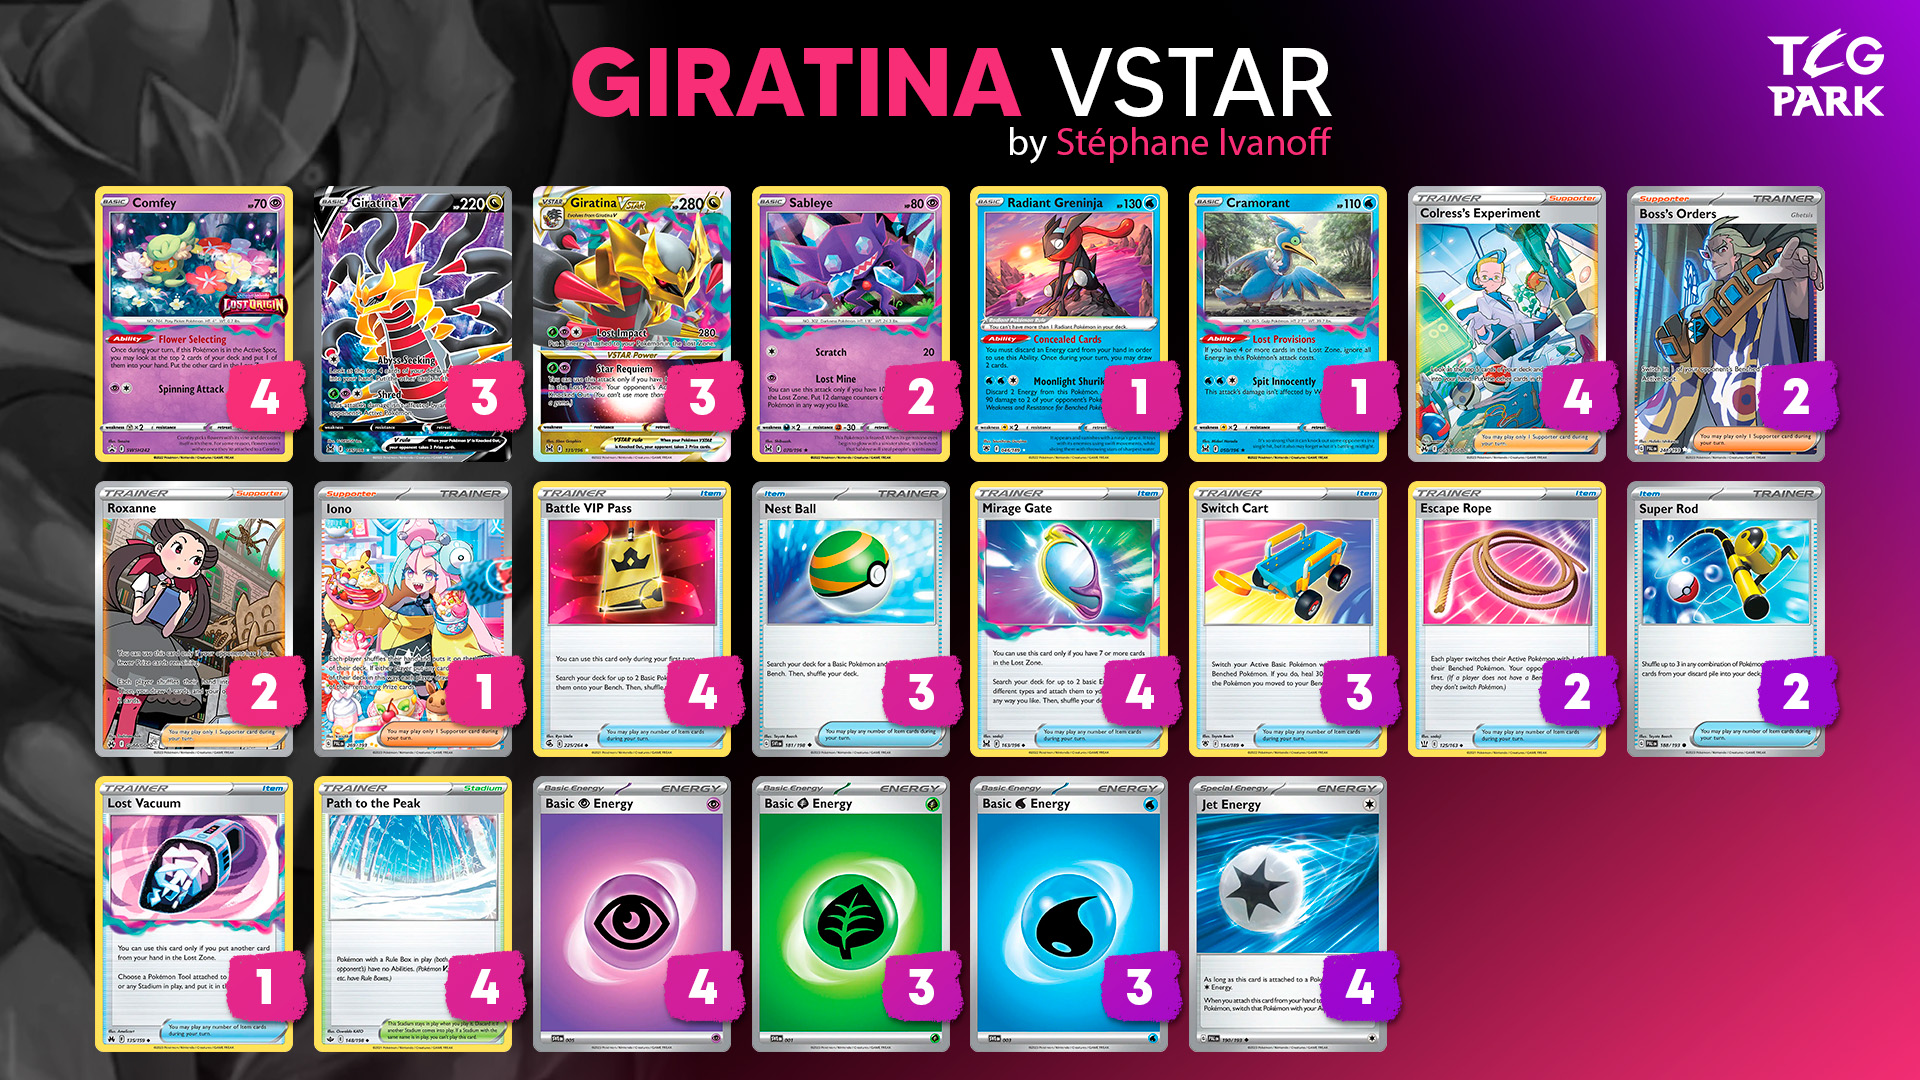
As a reminder, here’s the decklist that I’m recommending. For any comments on it, please read the article linked above!
| Pokémon – 14 |
|---|
| 4 Comfey LOR 79 |
| 3 Giratina V LOR 130 |
| 3 Giratina VSTAR LOR 131 |
| 2 Sableye LOR 70 |
| 1 Radiant Greninja ASR 46 |
| 1 Cramorant LOR 50 |
| Trainer Cards – 32 |
|---|
| 4 Colress’s Experiment LOR 190 |
| 2 Boss’s Orders LOR-TG 24 |
| 2 Roxanne ASR 188 |
| 1 Iono PAL 254 |
| 4 Battle VIP Pass FST 225 |
| 3 Nest Ball SVI 181 |
| 4 Mirage Gate LOR 163 |
| 3 Switch Cart ASR 154 |
| 2 Escape Rope BST 125 |
| 2 Super Rod PAL 188 |
| 1 Lost Vacuum LOR 162 |
| 4 Path to the Peak CRE 148 |
| Energy – 14 |
|---|
| 4 Basic {P} Energy Energy 22 |
| 3 Basic {G} Energy Energy 18 |
| 3 Basic {W} Energy Energy 20 |
| 4 Jet Energy PAL 190 |
Gardevoir Ex


While Gardevoir ex isn’t as omnipresent as it was a few months ago at the North American International Championships, it’s still a popular deck that you can expect to face at least once in any tournament. This matchup is fairly good, as long as you play it properly. The key part is to only target the opponent’s important Pokémon: the Gardevoir line. For example, if your opponent goes first and you can take a KO on a Ralts on the first turn with Cramorant, you should generally do it. However, if they have Mew Active and you can only KO that, don’t touch it: it’s better to use Abyss Seeking or an additional Flower Selecting instead.
The reason for this is that in this matchup, the Gardevoir player will usually need to play many support Pokémon: Radiant Greninja and/or Mew for early game draw, Manaphy as protection against your own Radiant Greninja, Cresselia for early game KOs. This can often leave them with little room for their Kirlia and Gardevoir, which provide draw power throughout the game. (Radiant Greninja also provides draw power, but it’s shut down by Path to the Peak.) Taking an extreme case, if the opponent has Mew, Greninja, Manaphy and Cresselia in play, they only have space for one Gardevoir ex and one Kirlia or Gardevoir. If you can KO that Kirlia or Gardevoir (usually with Sableye), and play Roxanne and Path to the Peak at the same time, the opponent usually won’t be able to do anything.
However, if you Knock Out Mew in the early game, then you free up space for another Ralts line.
As for how to actually take KOs to advance the game, the best option is, of course, to Moonlight Shuriken two Kirlia or Ralts, but we can assume the opponent will play Manaphy to prevent that. Your second best option is to use Abyss Seeking to fill your Lost Zone as quickly as possible to start threatening Lost Mine. Cramorant and Boss’s Orders (or Escape Rope) can, of course, take some early KOs on Kirlia and Ralts, but often, the opponent will actually make the first move and start taking KOs with Cresselia’s Moonlight Reverse. I’ve found that it’s actually a good idea to use Lost Impact to KO Cresselia: it usually brings your Lost Zone to nine or ten cards (allowing you to use Sableye on the next turn), and it leaves you with a high HP Pokémon in the Active Spot. Also, if the opponent took Prizes before you, you’ll have equalised Prizes taken, so their Reversal Energy are useless. They can KO Giratina VSTAR with Gardevoir or Zacian V, but in both cases, they put a lot of damage on their board, allowing you to use Sableye on the next turn to take two Prizes, either off Zacian V or off Gardevoir and Kirlia. You can also combine that play with Roxanne and, ideally, Path to the Peak, removing a lot of their options.
If the opponent plays Super Rod to get Cresselia back and take another KO with it, that’s a bit worse for you, but it still means they used a Super Rod to bring back non-Gardevoir pieces, and you can still use Sableye to take out a Kirlia on the next turn. When doing so, you should put the extra 40 damage on Gardevoir, so that even if it’s healed by Moonglow Reverse, it can still be KO’d by Sableye on the next turn.
Star Requiem should usually be kept for the late game, to KO Gardevoir ex. If it’s used too early, in some scenarios, the opponent can actually 2HKO a Giratina VSTAR with Gardevoir ex in the late game while having enough HP to tank Lost Impact. Keeping Star Requiem for as long as possible prevents that play.
Possible tech: 2nd Iono
The Gardevoir matchup doesn’t require any specific techs (the fourth Path to the Peak is already sort of a tech for it), but a 2nd Iono can help by providing more disruption against the opponent. Gardevoir can often accumulate a high number of cards in hand, and Iono is effective against that.
Lugia VSTAR / Archeops


This matchup is pretty close. Against Lugia, Cramorant and Sableye have marginal utility only, and you’ll usually aim to win by taking three two-Prizers with Giratina VSTAR.
The first plan is to stick a Path to the Peak in play as soon as possible, including on your first turn going first, to limit your opponent’s options. Path to the Peak can of course prevent the turn 2 Summoning Star play, but also a turn 1 Lumineon V for Professor Burnet. If you can delay your opponent’s setup by even one turn, that can go a long way in this matchup.
At the same time, you should try to get to seven cards in the Lost Zone as soon as possible. However, don’t use Abyss Seeking in this matchup! Putting a Giratina V in the Active Spot lets your opponent take an easy two Prizes if they can manage to get rid of Path to the Peak and put two Archeops in the discard. Instead, you should set up three Comfey in the early game to use Flower Selecting as much as possible. If you can use three Flower Selecting on turn 1 (thanks to Jet Energy), you can follow that up with Colress’s Experiment on turn 2 and start using Lost Impact. If you take the first big KO, you are in extremely good shape in this matchup.
The only Pokémon that resists Lost Impact is a Lugia VSTAR with a V Guard Energy attached. You should keep Star Requiem to get rid of it. Plus, Lugia VSTAR usually also has a Gift Energy on it, and Star Requiem lets you bypass that.
Super Rod is fairly important in this matchup, both to recover Energy discarded by Radiant Greninja (Lugia doesn’t play a lot of disruption, so you’ll usually draw a lot of cards), and to get Giratina VSTAR (and Giratina V if needed) from the discard.
There are two more plays that I want to discuss. First, if Tyranitar V starts in the Active Spot, one way to get rid of it is to use Cramorant for 110 damage followed, possibly later in the game, by Lost Mine for 120. (This also bypasses Gift Energy.)
Second, you can sometimes use Moonlight Shuriken to damage two Archeops, then use Lost Mine to KO both at once.
Both these plays are very situational. If the opponent has a full Bench and a bad hand, they can be good, but remember that most Lugia lists play Radiant Tsareena, which can prevent both of these plays. It’s usually better to keep Mirage Gate for Giratina and to keep taking these OHKOs on two-Prizers.
Possible techs: Temple of Sinnoh, Spiritomb
If you’re very worried about Lugia, Temple of Sinnoh is the best tech for it. Temple of Sinnoh combined with Roxanne is an extremely good play against Lugia VSTAR, both because it removes the draw from Gift Energy and because it forces the opponent to have a Stadium so that their Single Strike Energy can do anything, which they need to get a KO back. Spiritomb is also a good addition against Lugia because it shuts down Lumineon V, both in the early game when they can use it for Professor Burnet, and in the late game when they need it to come back from a Roxanne or Iono.
Lost Zone Box


It’s difficult to be precise when talking about the Lost Box matchup, because that name covers many different variants, from Sableye/Radiant Charizard to Kyogre builds. As a baseline, I’ll talk about what I consider the main build of Lost Box: agressive decklists with Dragonite V and Forest Seal Stone, Radiant Greninja, and a mix of Water, Psychic and Lightning Energy.
The main thing to understand about playing against Lost Box is that Giratina is useful. I see some players think that you shouldn’t play down Giratina in this matchup, but if you do that, you’re just playing a much slower version of your opponent’s deck, filled with dead cards. Giratina actually has two important uses: first, Abyss Seeking can be a good play in the early game to draw cards and accelerate your Lost Zone (if your Giratina V gets hit by Cramorant, use Switch Cart to heal it out of Lost Mine range); second, Giratina VSTAR has 280 HP and can’t be OHKO’d by anything usually played by Lost Box (except Radiant Charizard or Dragonite V with a Choice Belt, which is a rare occurrence).
Your main plan is to avoid putting a lot of low-HP Pokémon in play. When going first, you should play down two Comfey (so that you can put two cards in the Lost Zone on turn 1), Radiant Greninja and Cramorant. Only play down additional Comfey if you really need to. When going second, the same applies, except you can sometimes play down only one Comfey (for example, if you have Colress’s Experiment, Giratina V and Jet Energy, you can get to five cards in the Lost Zone on turn 1 thanks to Abyss Seeking; a second Comfey wouldn’t let you Mirage Gate any faster, but it would be a target for the opponent’s Moonlight Shuriken).
By doing this, the opponent will be forced to go for Giratina at some point, which is harder for them than just spamming Lost Mine to KO low HP Pokémon, like they do in the mirror match. If they ever take three Prizes, you can use Roxanne to shut them down. If they play around it by using Lost Mine to spread damage, you can heal some of it with Switch Cart.
As for taking your own KOs, Cramorant and Sableye are the best ways to do it, but always have a Giratina VSTAR ready to attack if you can! Especially if the opponent uses something like Dragonite V or Raikou V to take a big KO, you need to have something to answer them. (Note that Dragonite V is a trap: if they use it, they damage their whole Bench, and Sableye can easily clean up later in the game.)
Possible techs: Manaphy, 2nd Iono
I’ve explained in detail why I don’t play Manaphy in my initial article. However, Andrew Estrada just won Pittsburgh Regionals, the first major event of the season, with the Kyogre build of Lost Box. Against this deck, Manaphy is very good because it prevents a late game Kyogre play. Note that even if you have Manaphy in your deck, you shouldn’t play it down without care against Lost Box. If you do so, they will use Lost Mine to take it out and spread more damage. Even if you get Manaphy back, there will be too much damage on your board and Lost Mine can take additional KOs. Instead, keep using the game plan above, and keep Manaphy for the late game when Kyogre becomes a concern.
A second Iono is also good against Kyogre and Lost Box in general: if they try to only take two Prizes, you can play Iono to disrupt their hand anyway.
Giratina VSTAR


The mirror match is complex. Lots of factors decide who the winner is: who can fill their Lost Zone faster (Colress’s Experiment is very important here), whether you can take two Prizes with Moonlight Shuriken, whether disruption works, etc.
Generally speaking, play the early game like against a Lost Box deck: avoid benching Comfey if you don’t need to, use Cramorant to take Prizes, etc. However, it’s imperative to have two Giratina in play. If one player has Giratina and the opponent doesn’t, the one who has Giratina wins. After some point in the game, instead of Cramorant, the important part of the deck becomes the Giratina war: take out your opponent’s Giratina VSTAR before they can take out yours.
Additionally, both players usually play Roxanne. Avoid taking three Prizes if you can: ideally, you should take two Prizes in the early game (with Cramorant, Radiant Greninja, or even Sableye) and then take out two Giratina to win the game. If you take one Prize then use Lost Impact to KO your opponent’s Giratina, then the opponent can usually play Roxanne, take a KO back, and be in a much better position (the exception is if you can evolve and power up a second Giratina VSTAR before taking the KO).
Also, while Path to the Peak is generally useless in this matchup, if you have it, play it down before the opponent plays one, so that you can use Lost Vacuum later to add two cards to your Lost Zone.
Possible tech: Pokégear 3.0
I think the main way to improve the mirror match is to have a more consistent deck. Many cards can do that, like Nest Ball or Hisuian Heavy Ball, but Pokégear 3.0 can help you find Colress’s Experiment, which I think is the most important card in the matchup.
Mew VMAX / Genesect V
There are two possible Prize maps against Mew VMAX. First, if the opponent plays down a one-Prize Pokémon (usually Meloetta), you can KO it with Cramorant (or Sableye later in the game), then use Star Requiem to deal with Mew VMAX, and Lost Impact a two-Prizer for game at some point.
If the opponent has no one-Prizer on their board, then you’ll usually have to deal with two Mew VMAX: one with Lost Impact and Lost Mine (or Cramorant), and the other one with Lost Impact. If your opponent has a damaged Mew VMAX in play, avoid bringing up Comfey or Sableye (for example if the opponent plays Escape Rope), so that they can’t use Psychic Leap to take a KO.
Alternatively, if you manage to get an early KO on a Mew V or Genesect V, you can then use Star Requiem to KO Mew VMAX, and use Lost Impact again to KO another two-Prizer. That’s, of course, easier said than done, as Mew can also take quick KOs.
Thankfully, you have Path to the Peak in your deck. Path to the Peak improves your win rate simply by making Mew brick sometimes.
Just like against Lugia, avoid using Abyss Seeking, for the same reason: Giratina V can be easily KO’d by the opponent in the early game.
Possible techs: Spiritomb, Drapion V
Spiritomb makes life harder for the Mew player. If you have Spiritomb and Path to the Peak in play, the Mew player needs a Fusion Strike Energy on Genesect V and a counter-Stadium just to draw cards, which can be a tall order, especially in the early game. Spiritomb isn’t an autowin card, but added to a deck that can already take wins against Mew, it has a lot of potential.
If you want a stronger tech, consider Drapion V. This Pokémon will OHKO Mew VMAX. The opponent then needs to get rid of it while having Lost City in play (otherwise you can just Super Rod the Drapion back in to the deck), which will bring your Lost Zone closer to ten cards. At this point, you can simply use Star Requiem to win the game. The issue with Drapion V compared with Spiritomb is that it is useless in every other matchup (unlike Spiritomb which provides value, especially against Lugia), and that it’s a bad starter.
Charizard ex
Charizard ex is a favorable matchup, especially with four Path to the Peak. You can take early Prizes with Cramorant on Charmander and Pidgey, and threaten Moonlight Shuriken to force them to play Manaphy.
The important part is to not use Star Requiem too early. Since Charizard ex gets stronger the more Prizes you take, if you ever get in a situation where you have already used Star Requiem and the opponent has an undamaged Charizard ex in play, you usually lose (unless you have a way to take the last Prize, for example with Lost Mine). On the flip side, if you haven’t taken a lot of Prizes, Charizard isn’t a threat to your Giratina VSTAR. Therefore, it’s usually a better play to Lost Impact, the first Charizard ex, not taking it out. Then, you can use Lost Mine to finish it off alongside a Charmander, Pidgey or Manaphy. Finally, you can use Star Requiem to take out the next Charizard ex. If you took an early Prize with Cramorant, that’s all six Prizes accounted for.
Obviously, variations exist, for example if the opponent has Arceus VSTAR Active early on, or if you can get rid of Pidgeot ex with Boss’s Orders, but that’s usually the plan. Keep Path to the Peak in play as much as possible and you’ll win most of the time.
Possible techs: none
I don’t think any card would improve the matchup, since it’s already positive.
Miraidon Ex

Similarly to, say, the Lugia matchup, the Miraidon ex matchup often comes down to a trade between two-Prizers, except Giratina VSTAR can KO any of their attackers even if they have a Bravery Charm, while the opponent will struggle to deal with it (they need Raichu V and five Energy to discard). If you can chain Giratina VSTAR, they will have a lot of trouble.
They might use Zeraora to deal 60 damage to Giratina VSTAR, putting it in range of Miraidon ex (and possibly Raikou V). If they do, you can use Cramorant to KO Zeraora (keep your Lost Vacuum in case they put a Bravery Charm on it), and then use Sableye’s Lost Mine to KO Flaaffy later on. That allows you to get to six Prizes with a bit less reliance of Giratina VSTAR.
Note that Path to the Peak is great in the early game. Miraidon ex will usually set up their whole board on the first turn, thanks to Tandem Unit. If you can play down a Path before that, this limits their abilities and can slow them down significantly, especially against the Path to the Peak variants who usually only play Path.
Just like against Lugia and Mew, don’t use Abyss Seeking in the early game, as you could get KO’d by a Miraidon ex.
Possible techs: None
Adding more consistency is the best way to take on Miraidon, but there’s no specific tech that makes sense against it beyond what the deck already plays.
Chien-Pao ex / Baxcalibur
More than against any other deck in this list (except maybe Mew), Path to the Peak is the key card in this matchup. If you can stick a Path to the Peak in play every turn, your opponent will eventually brick, as they need Chien-Pao ex’s and Radiant Greninja’s Abilities for the deck’s engine to actually work.
Chien-Pao is another deck that can use Moonlight Shuriken easily, so just like against Lost Box, try using only one Comfey if possible. Abyss Seeking is fine here, because even though it’s possible for the opponent to KO Giratina V on turn two, they need a lot to do so (usually using Palkia VSTAR’s Ability), and you can retaliate with Lost Impact.
If you can’t make do with only one Comfey (if your hand is mediocre, for example if you have no Colress), then you should usually put three into play. This way, if the opponent uses Moonlight Shuriken, you still have one Comfey in play.
Roxanne and Path to the Peak are a deadly combination in this matchup. Usually, by using enough disruption, the opponent will, at some point, stop getting KOs, and you can take the lead.
Possible tech: Manaphy
Chien-Pao ex can use Moonlight Shuriken but doesn’t have an easy way to take out Manaphy on the Bench. The risk is a Cross Switcher / Cancelling Cologne play, so Manaphy isn’t a foolproof card, but many lists don’t play that combination, and against them, having Manaphy allows you to play Comfey early on and be safer.
Rapid Strike Urshifu VMAX / Inteleon VMAX
I’ve kept this matchup for last, as it’s the one that I received the most questions about. “I understand why Manaphy doesn’t help in this matchup, but then how do you actually win it?” is a common sentiment, and I’ll do my best to answer it. Note that I don’t actually have a perfect answer: this is, according to Limitless data, an unfavorable matchup, although several Rapid Strike players have told me it was not that easy for them.
Most Urshifu / Inteleon lists look alike, and there are some important things to know about them: they usually don’t play Boss’s Orders, and they usually play three Stadiums.
Because they only play three Stadiums, we can win the Stadium war even if we play down the first Path to the Peak. The opponent can of course use Octillery’s Ability every turn to draw Tower of Waters, but if they have to use Rapid Strike Search for that, then they aren’t drawing other important cards instead.
Because they don’t have Boss’s Orders, our Pokémon on the Bench are somewhat safe. Of course, the big threat is Urshifu VMAX’s G-Max Rapid Flow, but that will usually only be used once per game, and we should be ready to answer it with Star Requiem.
I used to think that you only want to play down one Comfey in this matchup, but after thinking about it more, I don’t think that helps. If you only have one Comfey, the opponent can still use Yoga Loop on it to set up additional KOs. I think playing two or even three Comfey is fine. After all, the opponent will usually use Inteleon VMAX in the early game to attack, and it’s fine if they KO Comfey: they basically only deal 70 damage, instead of 140.
Conversely, Abyss Seeking is a bit of a trap. We do want to fill our Lost Zone quickly, and Giratina V can’t be OHKO’d by the opponent, but taking 140 damage is not something we can do repeatedly without setting up easy KOs for the opponent later on. I think you can afford to use Abyss Seeking once, and only if you have a Switch Cart to heal the damaged Giratina V. If it takes only 110 damage (after Switch Cart’s healing) and evolves into Giratina VSTAR, it’s harder for the opponent to add damage later to the point where it can be KO’d by G-Max Rapid Flow on the Bench.
Another early game tip is to Bench three Giratina V if possible. This way, even if two get damaged, you can use the third one to take KOs. Since it can’t be OHKO’d, it can chain attacks more easily.
As for your Prize map, there are two possible options. If you can KO Octillery, especially early on, usually with Cramorant, go for it: it can slow down the opponent quite a bit, especially if you factor in Path to the Peak. Then, you can Lost Impact a two-Prize Pokémon such as Inteleon V, and Star Requiem whichever VMAX is Active.
Alternatively, you can 2HKO an Inteleon VMAX with Lost Impact and Lost Mine (the damaged Inteleon VMAX will usually retreat to the Bench, so you need to take it out there), then use Star Requiem to finish the game. As long as you haven’t given up too many Prizes early on, G-Max Rapid Flow won’t win the game for your opponent, and this means they can’t attack with Urshifu VMAX or they’ll get hit with Star Requiem. Be careful, though: the opponent can play Cheryl to heal their damaged VMAX after you attack it. If they have a Forest Seal Stone in play and they haven’t used their VSTAR Power yet, you can expect them to use Cheryl.
Possible techs: Fourth Switch Cart, fourth Giratina V
Switch Cart’s healing effect can be surprisingly powerful in this matchup, sometimes delaying the opponent by a whole turn. Having four copies of it makes it easier to have it at the right time. Also, having a fourth Giratina V makes it easier to have three copies in play, allowing you to retreat a damaged Giratina V and present a new untouched threat to the opponent.
Conclusion
I think that covers all the more common matchups! This metagame is actually incredibly varied, and there are other decks I could have mentioned, like Arceus VSTAR / Giratina VSTAR and Palkia VSTAR, not to mention other variants of the most played decks, like Colorless Lugia and Fusionless Mew. Nevertheless, I do have to stop at some point, and I think you can reasonably expect to play eight of your nine rounds of a Regionals day 1 against decks listed above.
Once again, thank you for reading, and a special thanks to the people who told me they were hoping I’d write again soon! I hope this guide will be helpful to you, and to those who don’t care about Giratina, I promise, I’ll cover something else next week. Take care!
Stéphane